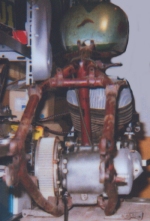
 Here's
the frame with a Scout motor (click for full size).
The cylinders/heads are Sport Scout, and there's plenty of air between
them and the frame tubes. 741 top ends (similar, but smaller) isn't any
problem, and there might even be room for OHV top ends.... If you think
there's too much air between heads and tank, you could fit a bigger tank
(Ariel would be kinda obvious...The front & rear tank mounts can bee
seen in this shot) or even Indian tanks.
Here's
the frame with a Scout motor (click for full size).
The cylinders/heads are Sport Scout, and there's plenty of air between
them and the frame tubes. 741 top ends (similar, but smaller) isn't any
problem, and there might even be room for OHV top ends.... If you think
there's too much air between heads and tank, you could fit a bigger tank
(Ariel would be kinda obvious...The front & rear tank mounts can bee
seen in this shot) or even Indian tanks.
Triumph trans doesn't have kicker/shifter here, but the kicker shaft goes in the rearmost hole, and the shifter pedal comes off the front shaft. Cover between them is for clutch adjustment and oil filling. You could mount footpegs between engine and trans and use a stock shifter pedal, or mount foot boards (or forward controls) and make a linkage to a forward mounted shifter pedal (or go foot clutch/hand shift...). The trans is mounted with a stud through the bottom, like Scouts + it has a top mount, which will be bolted to a rearward extension of the rear engine plates. These pictures just show the basic package. The finished bike could look very different, depending on parts like tank, seat, fenders -not to mention forks, wheels and such. With girder forks, Indian tanks, fenders etc, it could look very close to a factory Scout if you wanted.
 Other
side. You can see the air between heads/frame better here. There should
be at least as much on most other Brit single cylinder frames, as the Ariel
front downtube slopes back more than most. On the big pic (click), you'll
see a blue circle where I plan for the primary drive tensioning idler roller
to go (mounted on the engine plate with 2-part serrated HD primary tensioner
mounts), and red lines to symbolize the run of the belt/chain.
Other
side. You can see the air between heads/frame better here. There should
be at least as much on most other Brit single cylinder frames, as the Ariel
front downtube slopes back more than most. On the big pic (click), you'll
see a blue circle where I plan for the primary drive tensioning idler roller
to go (mounted on the engine plate with 2-part serrated HD primary tensioner
mounts), and red lines to symbolize the run of the belt/chain.
The belt drive parts are from a $50 swap meet Sportster kit. They might adapt to this new job (front pulley has bolted-in centre, and rear can be machined to fit on a Triumph clutch basket -they're cheep when the teeth are worn... but the pulleys are quite big. Diameter can be turned down, but a Triumph kit would be neater. Chain drive is still an option (see "chassis" photos), and an o-ring chain + simple guard could be used. Triumph clutch baskets use loose rollers, and lubing them with an open setup might be a problem. If a circular boss to take a lipped seal (or just a felt) to seal around the mainshaft + a grease nipple, accessible between clutch & trans, was welded to the back of the basket, and a piece of felt inserted inside the basket between hub/basket, I think that should take care of it though.
 Plenty
of space everywhere. Neat Gardner carb and prototype big bore Moto Valve
just for fun. The Gardner is a British flatslide carb (slide opens downward
with main jet for sort of acceleration pump effect). It's only got one
jet and a needle with a flat (at an angle for conical cross section) on
one side. You screw the needle in/out for mixture control, and guess at
which of several profiles you need for your bike. Then you figure out the
angle of flat to airstream for best acceleration and get a needle holder
indexed with the correct angle. Then you can raise the needle x full turns
to compensate for altiture etc and stil have the same basic setting. Neat.
These carbs were popular in racing in the '50s, and the maker just de-retired
and started making them again. Lots of the fastest guys in Brit classic
racing (John Cronshaw's Gold Star for one) run these. They take a separate
float bowl (SU works fine). This is a Mk2 with cast body. I have a Mk1,
made from bolted-up aluminum plates too (I forget what they cost, but $100
max each). Just an aside...
Plenty
of space everywhere. Neat Gardner carb and prototype big bore Moto Valve
just for fun. The Gardner is a British flatslide carb (slide opens downward
with main jet for sort of acceleration pump effect). It's only got one
jet and a needle with a flat (at an angle for conical cross section) on
one side. You screw the needle in/out for mixture control, and guess at
which of several profiles you need for your bike. Then you figure out the
angle of flat to airstream for best acceleration and get a needle holder
indexed with the correct angle. Then you can raise the needle x full turns
to compensate for altiture etc and stil have the same basic setting. Neat.
These carbs were popular in racing in the '50s, and the maker just de-retired
and started making them again. Lots of the fastest guys in Brit classic
racing (John Cronshaw's Gold Star for one) run these. They take a separate
float bowl (SU works fine). This is a Mk2 with cast body. I have a Mk1,
made from bolted-up aluminum plates too (I forget what they cost, but $100
max each). Just an aside...
 The
paint on the little Danish "Skylon" moped tank is original. I hope to be
able to touch it up as it is a perfect "period" design (any period, actually,
scallops & flames are almost always cool...). As for the general paint
scheme, I have this idea of having the frame "Ariel" red (like in the pic
~ kinda dark "Indian" red), the tank as is, the headlight dark green and
the rear fender light green (or 2-tone dark/light) to accentuate the flow
in the tank paint while breaking up all the green with the red frame. Might
be too weird, but I'll find out and maybe do something a little more restrained.
I plan to leave brakes, forks, engine/trans cases and as much other aluminum
as possible in a natural unpolished state, and have exhaust, engine plates,
nuts & bolts and as many other shiny bits as possible in stainless
steel. While the technical solutions are the most important, I like to
think that some sort of plan for the aesthetics is what makes a good bike
great, or whatever... In this case the idea would be something like: Most
of the mechanical bits in aluminum, the connecting hardware in stainless,
the frame in a color that both signified its origin and "Indian", and some
"swoop" in the tinware colors to give a hint at the overall philostophy
(huh?) behind the bike (I'm aware there's holes in the logic of how the
components are split up, but this sort of stuff shouldn't be too rigid.
The builder may have ideas but the metal makes decisions). Going totally
anal, I could go on with the "interfaces between systems" being black...
rider-to-bike, black grips, seat, footpegs; bike-to-road, tires. But I
won't do that.... I guess all this drivel just goes to show that you can
use almost any bits you find, and then try to be a little sensitive about
them (getting to know their inner self kinda thing) as you work with them,
and end up with a bike that, while being built from odd bits, is still
kind of a whole. Not like a factory cranked it out, but like you worked
the pieces together into YOUR bike.
The
paint on the little Danish "Skylon" moped tank is original. I hope to be
able to touch it up as it is a perfect "period" design (any period, actually,
scallops & flames are almost always cool...). As for the general paint
scheme, I have this idea of having the frame "Ariel" red (like in the pic
~ kinda dark "Indian" red), the tank as is, the headlight dark green and
the rear fender light green (or 2-tone dark/light) to accentuate the flow
in the tank paint while breaking up all the green with the red frame. Might
be too weird, but I'll find out and maybe do something a little more restrained.
I plan to leave brakes, forks, engine/trans cases and as much other aluminum
as possible in a natural unpolished state, and have exhaust, engine plates,
nuts & bolts and as many other shiny bits as possible in stainless
steel. While the technical solutions are the most important, I like to
think that some sort of plan for the aesthetics is what makes a good bike
great, or whatever... In this case the idea would be something like: Most
of the mechanical bits in aluminum, the connecting hardware in stainless,
the frame in a color that both signified its origin and "Indian", and some
"swoop" in the tinware colors to give a hint at the overall philostophy
(huh?) behind the bike (I'm aware there's holes in the logic of how the
components are split up, but this sort of stuff shouldn't be too rigid.
The builder may have ideas but the metal makes decisions). Going totally
anal, I could go on with the "interfaces between systems" being black...
rider-to-bike, black grips, seat, footpegs; bike-to-road, tires. But I
won't do that.... I guess all this drivel just goes to show that you can
use almost any bits you find, and then try to be a little sensitive about
them (getting to know their inner self kinda thing) as you work with them,
and end up with a bike that, while being built from odd bits, is still
kind of a whole. Not like a factory cranked it out, but like you worked
the pieces together into YOUR bike.
 This
shot (big version) has engine plates outlined in red. Notice the rearward
extension to take the top gearbox mount.
This
shot (big version) has engine plates outlined in red. Notice the rearward
extension to take the top gearbox mount.
There's room for a Brit dynamo (DC generator) or small alternator in the front engine plates (blue circle in big shot), if suitably holed. Brit dynamos often have the drive shaft offset from the center of the body, so tensioning belt/chain drive from the engine shaft could be as easy as rotating the generator. Simple way of mounting dynamo in hole is to make little "lips" on the engine plates, parallel to the dynamo, sort of a cradle, and use "jubilee" clips (adjustable bands, what's the US name?) to secure the lot. There are plenty of other generator options, and I'll get into that some other time. If you had the Stock Scout generator etc, there's no reason why you couldn't incorporate that into the front engine plates.
You can't see it too well here, but the rear exhaust pipe goes well within the shift pedal. No problem with pipes at all. You could probably use stock Scout pipes if you don't have a swimming pool ladder handy...
 Here
you see the gap in the front of the frame. The Ariel frame is not bolted
together from 2 parts like the Scout, but it's still "Scout-like" at the
front end. This frame is very light (even lighter than the Scout frame,
I think) and steers very well. They used the same frame for both singles
and the 1000cc Square Four, so it should be able to handle even real hot
Scout motors just fine. On my frame the left hand part of the lower frame
is missing. You can see on the existing part what it should look like.
Fortunately Triumph frames before '63 are very similar here, and I've got
a bent one to fix this with. This also takes care of the sidestand mount
as that is on this part of the Trumpet frame.
Here
you see the gap in the front of the frame. The Ariel frame is not bolted
together from 2 parts like the Scout, but it's still "Scout-like" at the
front end. This frame is very light (even lighter than the Scout frame,
I think) and steers very well. They used the same frame for both singles
and the 1000cc Square Four, so it should be able to handle even real hot
Scout motors just fine. On my frame the left hand part of the lower frame
is missing. You can see on the existing part what it should look like.
Fortunately Triumph frames before '63 are very similar here, and I've got
a bent one to fix this with. This also takes care of the sidestand mount
as that is on this part of the Trumpet frame.
As a curious aside, Ariel had their own "plunger" rear suspension design with a system of linkages to keep rear chain tension constant. This could be neat for a more "factory" look Ariel/Scout. The price would probably be much the same as a rigid model, but vary wildly: If someone needs it it's expensive, if not who knows...
You can see the Triumph gearbox sticking out a bit. This isn't too bad in real life as you'll see in some of the next shots. The little stub is for the shifter pedal.
 Here's
the rear (pic badly doctored to the right of bike, but this is done on
my day off...). The bottom gearbox mount (with drain plug in the middle)
can be seen here, as well as the boss for the top mount. Here's
the rear (pic badly doctored to the right of bike, but this is done on
my day off...). The bottom gearbox mount (with drain plug in the middle)
can be seen here, as well as the boss for the top mount. |
 And
here's the front. Oil pump not fitted in this shot, but compare with some
of the othes. Still a very slim and neat bike, I think (even if carb will
stick out more). Stock tank mounts will have to go if I go with this tank.
A dead neat way of mounting small tanks like this, is to insert a tube
(with allen bolt countersink) vertically in the frame tubes, weld threaded
mounts in the "roof" of the tank tunnel (make them cover a good part of
the tank bottom to spread the load), and bolt the tank on from below... And
here's the front. Oil pump not fitted in this shot, but compare with some
of the othes. Still a very slim and neat bike, I think (even if carb will
stick out more). Stock tank mounts will have to go if I go with this tank.
A dead neat way of mounting small tanks like this, is to insert a tube
(with allen bolt countersink) vertically in the frame tubes, weld threaded
mounts in the "roof" of the tank tunnel (make them cover a good part of
the tank bottom to spread the load), and bolt the tank on from below... |
 Overall shot. Looks good to me!