|
|
|
|
|
|
| Well, last month we laid the ground work for the new project Chief. The bike arrived quickly, and well packaged. The disassembly and inspection of the parts has begun, and some problems uncovered. | Click on pictures for full size |
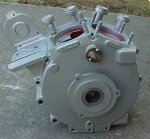
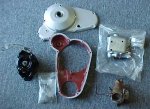
| When the seller was asked about engine or case welds, there were none.... wrong! Both have had some repair work, but both appear useable at this point. The engine was rebuilt 7 years ago, and actually this part was true. However, the iron flywheels are very rusty, so moisture has been present without protection. The heads are good, and have only minor fin damage which I'll leave since this is a rider. Due to moisture, disassembly is slow and painful, but we're making progress. The forks are poor, but may be salvageable. The frame had nice paint, but from years of kicking around in a basement, it will need to be repainted. The seat mount is missing from the frame, so I would have messed up the paint anyway, when I re-weld a new casting in place. The front wheel is correct for a front drive speedo, but the hub is laced to an 18" rim. Generator needs a rebuild, the carb needs a brass float (it's also an accessory model Linkert). Rear wheel will need refinish and spokes, but otherwise looks solid. Of course most of the small bits are missing, but the kicker arm and gears are all very nice. The transmission internals look new, but we'll have to do some inspecting upon disassembly. All of the shock parts are there, as well as the distributor and oil pump. The pump is pretty rusty, so it will need a good soaking prior to disassembly. | Part
One of article here!
|
| While assembling
initial orders for small parts for sub assemblies such as carb, distributor,
shocks etc., I start cleaning and separating the various parts into groups
that need different processes, such as Cadmium plating, chrome removal,
paint, powdercoat etc.. Many old bikes had chrome plating added in the
past to parts that shouldn't have been chromed, so the removal will be
the first batch to farm out. After they come back, I will send the parts
out that need cadmium plating. By this time, I should have frame repairs
done, and all of the parts ready for the powdercoater.
It turns out that the case welding is pretty solid, but whoever did the repairs never bothered to grind out any of the welds. The transmission internals are all new, so it was just a matter of stripping it down, clean it up, seal the inside, paint the outside, and reassemble. Typically, the "rebuilder" left out a few small pieces in the transmission, but it was never run, so no harm done. The engine internals were surprisingly clean, other than surface rust on the flywheels. They used some sort of assembly lube on the shafts and bearings that has since turned to bear snot, but it cleaned up to reveal brand new shafts and bearing races. It took a full can of Aerokroil to free up and disassemble the oil pump, but again everything (except the gears) is perfect. |
Finished parts |
| The frame is real
nice. The only issues to deal with here are removing the frozen remnant
of the lower seat post tube, remove the old bearing races and mount a new
seat pivot. Oh yeah, one other item to deal with on the frame; who knows
why, but they welded two 2" tall posts made from hex stock to the upper
shock casting, so these need to be ground off.
Now it's time to get in the proper mind set to spend countless hours with the bead blast cabinet. This isn't too glamorous or fun, but it is a necessary evil. Remember to clean the parts very well after bead blasting to remove any embedded beads. See Kiwi's article in the April issue..... 'nuff said. I hate doing wheels, so as you may have noticed, I left these till last. Since I am only planning to use the original rear wheel, I'll leave the front alone for now. Once I removed the rear drum, inspection revealed that two of the stud holes had been re-threaded, and the sprocket was welded to the drum. Since removal of the welds would likely destroy an otherwise salvageable drum, I'll just clean them up and replace the remaining rivets. The bearing area of the drum is badly worn, but I can repair the wear enough to keep the ´ bearing from spinning which is welcome news. The rear rim will be powder coated, so it will go to the chrome shop first, for chrome removal. |
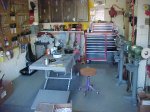
Stan's workshop |
| A word of caution;
when ordering parts from the various dealers, compare items when you can.
A good example would be things sold in assemblies or kits. Sometimes, these
kits can be a lot less expensive than the individual pieces. If you only
need one piece out of the kit, look for the dealer that sells the individual
parts. An example is the horn button. If you only need the spring, why
buy the whole assembly. Several items are sold both ways, but you may have
to
search each catalog to see how each dealer sells the part. This is where
I feel it is essential to have all of the dealer catalogs, and the parts
book for the model you are working on. All of the dealers sell quality
parts, but in certain cases, one may fit better than another, but this
can only be determined from experience with each part. Often, you
can be fooled into thinking one part is better, or a dealer is too expensive,
because of the price. When there is a large difference in prices, call
the dealers, and ask why. They are very familiar with each others parts,
and should be able to explain the differences. Some dealers sell more of
a particular part than others, so they may have better buying power, which
allows better pricing.
I can't stress enough how expensive it will be to replace the missing parts in a basket case bike! Keep watching the cost sheet, as things start to escalate. When you are placing orders for small items that only cost $3 or $4 each, make sure to add up the totals before placing the order. These small items add up very fast, and you can easily underestimate how many of these "cheap" little widgets there are in an Indian. On this project, I am careful to salvage anything I can, except in critical areas that could cause catastrophic failure (fatal error for you tech heads). You may be able to clean a crusty old bearing up, and think it is perfect, but for the $20-40 (depending on which one), it really isn't worth destroying a $600 (or more) part when it fails. THROW THEM AWAY! If you decided to try reusing a transmission main bearing, and it fails, you could take out the Housing ($600), Main Shaft ($275), Clutch Basket ($150), for a total of $1025 worth of damage, not counting time, and assuming no other damage was done. Buy the cheaper, "replacement" head light if you need to save money, rather than skip the bearings....... |
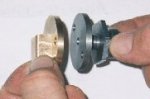
 More on alternators here! |
| Unfortunately, this project
bike was missing all of the seat components (seat pan, seat post, bushing,
seat T, and pivot mount) which will add a little over $500 to the project
cost. These are things that you want to take into account when negotiating
with a seller. Often the seller bought the bike in pieces some time back,
with the dream of putting together a real Indian motorcycle, and then realized
that they either couldn't afford to finish it, or they had no clue how
to finish it. In this case, they also have no clue what things cost today.
Do the homework before you buy a basket case so you are armed with enough
information to negotiate a fair deal. I see baskets advertised all the
time for $7-9000, and if you pay the price you will end up with a very
expensive lesson in what parts cost when you go to complete the bike. In
this case, I'm into the basket for around $5000 with shipping, so we have
a bit more room to work, and still keep the cost within reality.
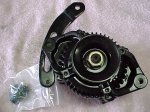
I checked two wrecking yards, looking for the alternator, and the first one was more than happy to sell me what I wanted for $50, but I decided that was too high. The second one said if I pulled it myself, I could have it for $10. Now we're talkin', so I grab an adjustable metric (crescent) wrench and soon remembered why I quit working on foreign cars! Oh well, what's a little skin and blood when I just saved 40 bucks, right? How can anyone complain about a complete charging system for an Indian for $10!!!! |
Project Cost Sheet |
| Since this is a
Virtual Indian project topic bike, I decided early on, to use parts that
were made by VI list members whenever I could. For a little extra crankcase
ventilation, I bought a "new and improved" Moto Valve from Duffy (casting
by Lyle), and it looks to be a very nicely made unit. Commercial dealers
that have made VI aware of new products that I can use, will supply those
parts so that I can evaluate the fit and function. All of the parts for
this project are paid for, and not donated by any of the dealers. I will
highlight the new parts as they are used, but I have no commercial interest
in any of them. If they work, I'll say so. If they don't, I'll tell you
that too, along with what I didn't like about the product, or what needs
correction. I primarily use the 3 major parts dealers, and in this case,
tried to split the orders up pretty equally, but that never works out perfectly,
so when looking at the cost sheet, you should not assume that the dealer
that sold me the most parts (read dollars), is necessarily my favorite,
or a "preferred" dealer.
Well, parts are starting to arrive, so I have work to do. Next month maybe I can supply some pictures of subassemblies that start to look more like a real motorcycle! Until then, Indian's rule, and Harley's drool! Pass the word.... |
Moto Valve Moto Valve article with tester feedback here! Installing the Moto Valve (How-to) here! |